If you are getting started with SDN, Mininet is an amazing tool with which you can create and test a realistic virtual network.
In this post, I will cover the following topics-

After you are in, run sudo wireshark &. This will open Wireshark built in the Mininet VM. Ignore any warnings. Start the packet capture on Loopback (lo) interface. Use filter of to filter through the clutter. This will show you OpenFlow messages.
In this post, I will cover the following topics-
- Mininet VM Setup
- Monitoring Traffic in Wireshark
- OpenFlow Messages
Mininet VM Setup
You need to follow these steps to get your Mininet VM up and running.
- Download and install VirtualBox (https://www.virtualbox.org/wiki/Downloads) and Mininet VM image (https://github.com/mininet/mininet/wiki/Mininet-VM-Images). Extract the Mininet VM and open it using VirtualBox.
- Before running the VM, go to Settings of the VM in VirtualBox and set Adapter-2 as Host-Only Adapter.
- Start your VM. You can log in using PuTTY. Default log in credentials are mininet/mininet.
- If you are on Windows, you need Xming X Server for Windows (http://sourceforge.net/projects/xming/files/latest/download?source=files) to run Wireshark (built in the Mininet VM) or access the hosts/switches.
Creating a simple topology
Once you are in the Mininet VM, you can use ifconfig to figure out the IP address of your VM. Once you have it, run PuTTY and connect to the VM using that IP address.
Now that you are in the Mininet VM, run sudo mn . This will start a simple topology, as shown below. In case you are wondering, 'sudo' stands for 'substitute user do' (and in this case makes you execute commands with root privileges) and 'mn' stands for mininet.
Now that you have a topology running, next is to look at various packets flowing between the controller and the switch.
Packet Capture
To do this, start another PuTTY session to your VM. This time, make sure that you enable X11 forwarding under Connection/SSH/X11, as shown. Connect to your VM as before.
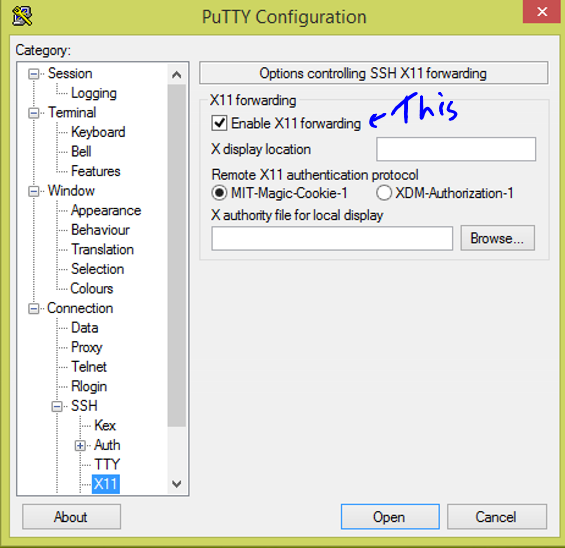 |
| Enabling X11 forwarding |
After you are in, run sudo wireshark &. This will open Wireshark built in the Mininet VM. Ignore any warnings. Start the packet capture on Loopback (lo) interface. Use filter of to filter through the clutter. This will show you OpenFlow messages.
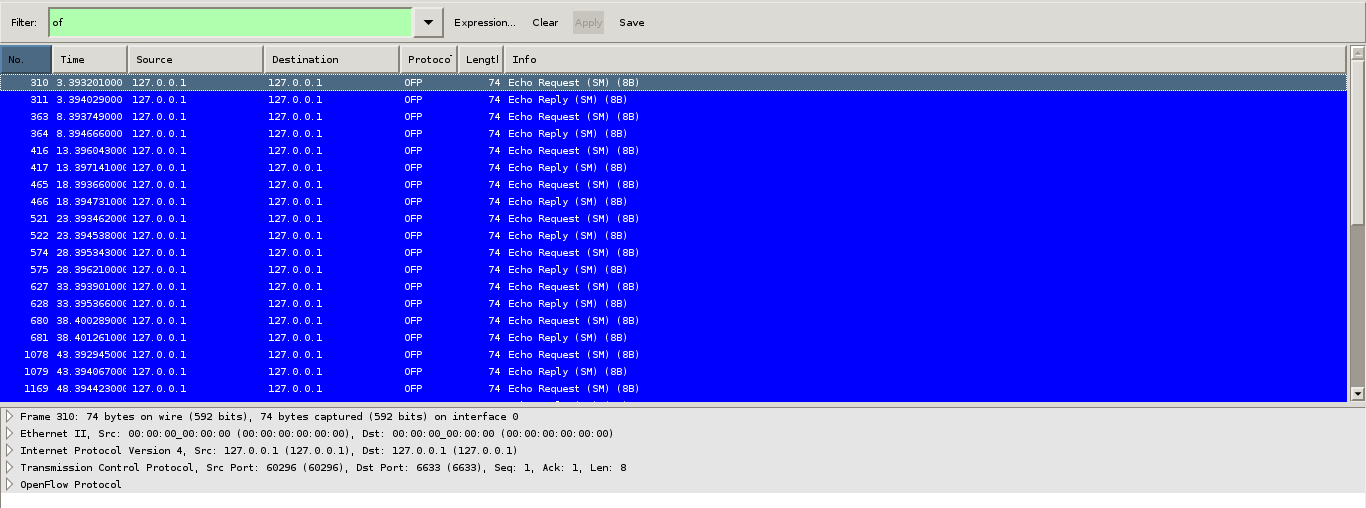 |
| Wireshark capture of OpenFlow messages |
This brings us to the messages you'll see in OpenFlow.
- Hello - Sent from Switch to Controller when switch boots up. Controller replies back to Hellos from switches.
- Features Request/Reply - The controller sends this message to every switch it is connected to in order to figure out switches capabilities.
- Echo Request/Reply - It's an ongoing message between controller-switch to make sure connection is up. These messages are sent every 5 seconds. You can see this one above. Switch sends the Request and the Controller sends Reply back.
- Packet_IN - Sent from Switch to Controller when it sees a 'new' packet (usually the first packet of a flow).
- Packet_OUT - Sent from the Controller as a reply to Packet_IN message. It has the 'action' (forward to port 5, drop, discard etc) that will be taken for that packet. This type of message is usually sent for broadcast messages.
- Flow_Mod - This type of packet is also sent in reply to Packet_IN message. It goes one step further and installs a flow entry in the switch. This one is usually sent for unicast messages.
In Mininet, you'll notice either Packet_OUT or Flow_Mod in reply to Packet_IN messages. This is by design of OpenFlow 1.0, which we are using here.
I encourage you to look at packet capture from wireshark. It's not fun, but it's really informative.
To exit mininet, use exit. Use sudo mn --clean after you are done.
You can read more about Mininet and OpenFlow by visiting these links-
- Mininet Walkthrough (http://mininet.org/walkthrough/)
- OpenFlow Tutorial (http://archive.openflow.org/wk/index.php/OpenFlow_Tutorial)
Let me know if there is anything specific on Mininet that you want me to cover. Between school and work, I will try to find time for at least one or two posts every week (at least that's what I'm telling myself.)
Until next time.
No comments:
Post a Comment